Here is an overview of the map layouts for Valorant, focusing on the key features, bomb sites, and strategic elements of each map:
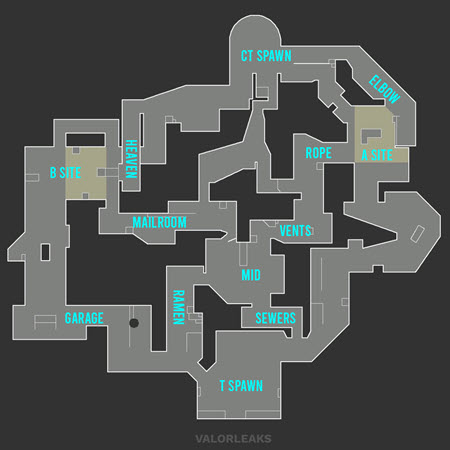
Bind
•Layout: Two bomb sites (A and B) with no middle area; features unique one-way teleporters between the sites.
•Key Features:
•Attacker and Defender spawns are connected by teleporters, enabling quick rotations.
•Popular for close-quarters combat due to its tight spaces.
•Strategic Points:
•"A Short" and "B Short" are critical choke points.
•"Hookah" and "Showers" are common lurking spots.
Haven
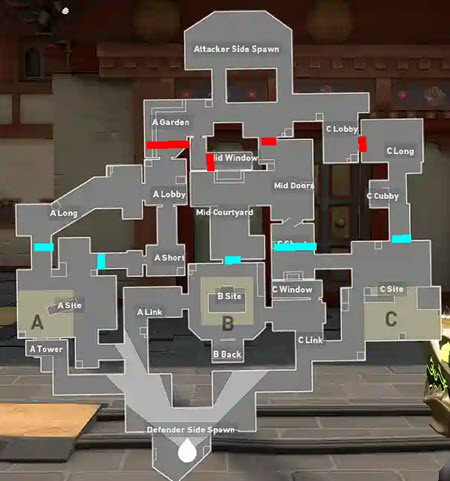
•Layout: Three bomb sites (A, B, and C), making it unique in Valorant's map pool for its size and complexity.
•Key Features:
•Central B site with long sightlines to both A and C.
•No teleporters but wide open areas for long-range engagements.
•Strategic Points:
•"Mid Window" for control over B site.
•"A Long" and "C Long" for aggressive pushes or defensive holds.
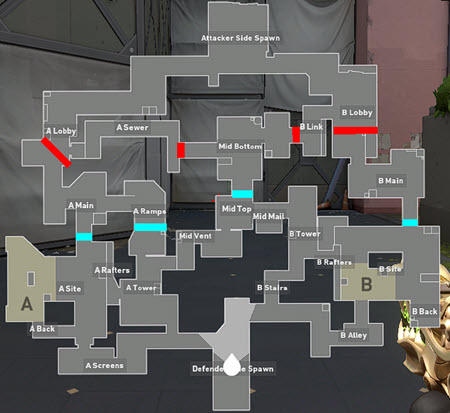
Split
•Layout: Two bomb sites with an elevated mid-section and verticality due to ropes and ledges.
•Key Features:
•Heavy defender advantage due to multiple choke points and high ground.
•Ropes allow for vertical movement and surprise attacks.
•Strategic Points:
•"A Rafters" and "B Tower" for high ground control.
•"Mid Vent" for sneaky rotations or ambushes.
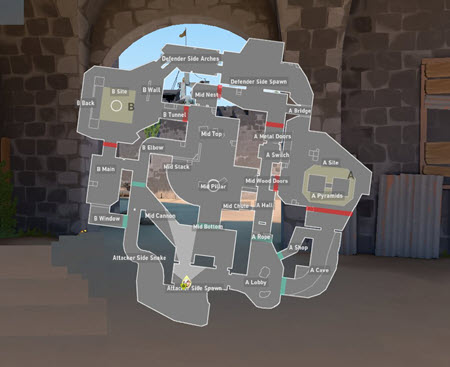
Ascent
•Layout: Two bomb sites with a large, open mid area; features destructible doors for strategic cover.
•Key Features:
•Doors at each site can be closed to block off access or destroyed for a different approach.
•Mid control is crucial for rotations and site takes.
•Strategic Points:
•"Market" for flanking opportunities.
•"A Heaven" and "B Heaven" for high ground advantage.
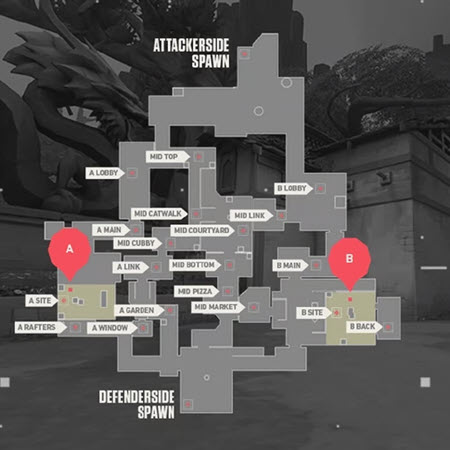
Icebox
•Layout: Two bomb sites with significant verticality through container stacks and ziplines.
•Key Features:
•"Belt" area for mid control and rotations.
•Numerous angles and peek spots, making it complex for both attackers and defenders.
•Strategic Points:
•"A Pipes" and "B Orange" for defensive setups.
•"Mid Nest" for controlling the map's center.
Breeze
•Layout: Large map with two bomb sites, featuring open spaces and long sightlines.
•Key Features:
•One-way drop doors for quick site rotations.
•Vast areas allow for lurkers and snipers; less cover in some areas.
•Strategic Points:
•"Mid Top" for controlling the map's center.
•"A Cave" and "B Site" for strategic positioning.
Fracture
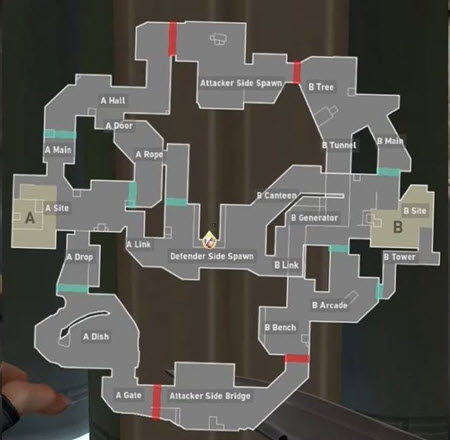
•Layout: Unique "H" shape with two sites and two attacker spawns, promoting split strategies.
•Key Features:
•Ziplines for quick movement across the map.
•Both sites are distant from each other, requiring effective team coordination.
•Strategic Points:
•"A Dish" and "B Arcade" for key engagements.
•"Mid Top" for map control.
Lotus
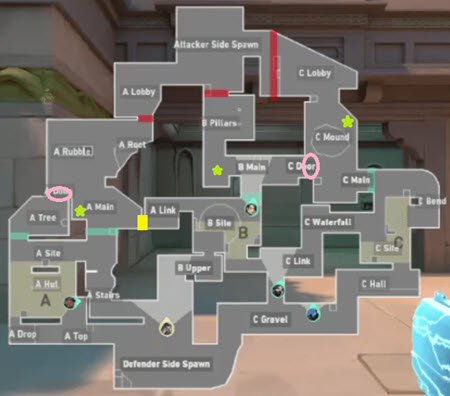
•Layout: Three bomb sites in an ancient temple setting; similar to Haven in layout but with unique mechanics.
•Key Features:
•Rotating doors that can open or close pathways.
•A third ultimate orb in the middle of the map.
•Strategic Points:
•"A Rubble" for controlling access to A site.
•"C Waterfall" for sneaky entries or defenses.
Pearl
•Layout: Two bomb sites with an underwater city theme, featuring more traditional FPS map design but with unique elements.
•Key Features:
•No special mechanics like teleporters or doors, focusing purely on gunplay and positioning.
•Wide corridors and open areas for engagements.
•Strategic Points:
•"B Main" and "A Main" for direct confrontations.
•"Mid Link" for controlling the center of the map.
Sunset

•Layout: Two bomb sites with a focus on mid control, set in a stylized, futuristic Los Angeles.
•Key Features:
•A central area with multiple paths and verticality for strategic play.
•Long sightlines mixed with tight corners.
•Strategic Points:
•"Mid Doors" for controlling the map's center.
•"A Link" and "B Elbow" for site attacks or defenses.
Note: Each map in Valorant has its own strategic nuances, requiring players to adapt their playstyle, agent selection, and team composition. Learning these maps involves understanding not just their layout but also common tactics, choke points, and how to use agent abilities effectively on each. |
You May Also Like:
•System Requirements Guide for Valorant
•Controls & Settings Guide to Valorant
•Customization Guide to Valorant
•Getting Started with Valorant
•Improving Your Skills in Valorant
•Additional Features in Valorant
•Top 10 Tips & Tricks for playing Valorant